A Beginner’s Guide to Dependency Injection in .NET
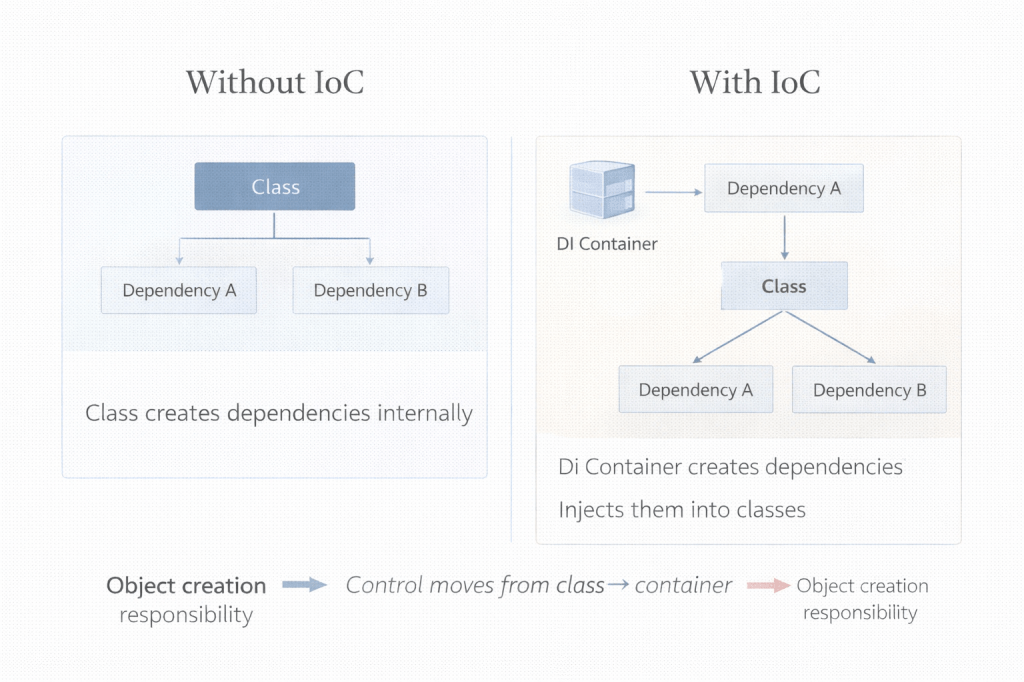
If you’ve spent any significant time building scalable applications, you know that tight coupling is the enemy of maintainability. When Class A is hard wired to create an instance of Class B, testing becomes a nightmare, and refactoring turns into a game of Jenga.
Enter Dependency Injection (DI). While often treated as a buzzword in software architecture, DI is a fundamental design pattern that transforms how objects interact. For developers moving into the .NET ecosystem perhaps from a Python or data science background, understanding how .NET handles DI natively is crucial for building robust, testable, and modular applications.
In this guide, you’ll learn:
- The core philosophy behind Inversion of Control (IoC) and DI.
- How to implement DI using the built-in .NET service container.
- The critical differences between Singleton, Scoped, and Transient lifetimes.
- Best practices for keeping your architecture clean and performant.
The Problem: Why Tight Coupling Fails
Before we implement the solution, let’s clearly define the problem. Imagine you are building a service that processes user data. In a tightly coupled scenario, your UserService might look something like this:
public class UserService
{
private readonly SqlDatabase _database;
public UserService()
{
// Tight coupling: UserService is directly responsible
// for creating the SqlDatabase dependency.
_database = new SqlDatabase();
}
public void AddUser(string name)
{
_database.Save(name);
}
}
This code works, but it introduces several critical issues:
- Rigidity: If you want to switch from SqlDatabase to a cloud-based solution or a mock database for testing, you have to modify the UserService code directly.
- Testing Difficulty: You cannot unit test UserService in isolation because it creates its own dependency. You are forced to rely on the actual database implementation.
- Scalability: As dependencies grow, managing their instantiation and lifecycle becomes chaotic.

The Solution: Dependency Injection
Dependency Injection resolves these issues by applying the Inversion of Control (IoC) principle. Instead of a class creating its dependencies, those dependencies are “injected” into it from the outside typically via the constructor.
Here is the refactored version of our previous example:
// 1. Define an interface for the dependency
public interface IDatabase
{
void Save(string data);
}
// 2. Implement the interface
public class SqlDatabase : IDatabase
{
public void Save(string data)
{
// SQL implementation logic
}
}
// 3. Inject the interface into the consumer
public class UserService
{
private readonly IDatabase _database;
// The dependency is injected via the constructor
public UserService(IDatabase database)
{
_database = database;
}
public void AddUser(string name)
{
_database.Save(name);
}
}
By coding to an interface (IDatabase) rather than a concrete implementation (SqlDatabase), UserService no longer cares how data is saved, only that it is saved. This small shift unlocks immense architectural flexibility.
Implementing DI in .NET Core
Modern .NET (including .NET 6, 7, and 8) has a Dependency Injection built directly into the framework core. You do not need third party libraries like Autofac or Ninject for most standard use cases.
The implementation involves two main steps:
- Registration: Telling the framework which concrete classes to use for which interfaces.
- Resolution: The framework automatically instantiates the required dependencies when needed.
This usually happens in the Program.cs file (or Startup.cs in older versions).
var builder = WebApplication.CreateBuilder(args);
// Register the dependency
// “When someone asks for IDatabase, give them SqlDatabase.”
builder.Services.AddScoped<IDatabase, SqlDatabase>();
// Register the consumer
builder.Services.AddScoped<UserService>();
var app = builder.Build();
When the application runs and a UserService is requested, the .NET framework checks its constructor, sees it needs an IDatabase, creates an instance of SqlDatabase, and injects it automatically.
Understanding Service Lifetimes
One of the most critical aspects of DI in .NET is managing the Service Lifetime. When you register for a service, you must decide how long that instance should live. Choosing the wrong lifetime can lead to memory leaks or threading issues.
There are three primary lifetimes:
1. Transient
Transient services are created each time they are requested.
- Behavior: A new instance is provided to every class and every individual request.
- Best For: Lightweight, stateless services.
- Registration: builder.Services.AddTransient<IMyService, MyService>();
2. Scoped
Scoped services are created once per client request (e.g., within a single HTTP web request).
- Behavior: Within a single HTTP request, if multiple classes ask for this service, they will all share the exact same instance. Once the HTTP request finishes, the instance is disposed of.
- Best For: Database contexts (like Entity Framework DbContext) and user session data.
- Registration: builder.Services.AddScoped<IMyService, MyService>();
3. Singleton
Singleton services are created the first time they are requested, and then every subsequent request uses the same instance.
- Behavior: A single instance is shared across the entire application for the lifetime of the app.
- Best For: Caching services, configuration settings, or services that are expensive to create and stateless.
- Registration: builder.Services.AddSingleton<IMyService, MyService>();
Visualization of Lifetimes
To verify this behavior, imagine a request pipeline that touches Controller > Service A > Service B.
- Transient: Controller, Service A, and Service B would each get a distinct instance (3 total).
- Scoped: They would all share the same instance (1 total per HTTP request).
- Singleton: They would share the instance created when the app first started (1 total per app lifetime).
Best Practices for AI and Data Engineering Integration
For developers integrating AI models or complex data pipelines into a .NET backend, proper DI usage is vital for performance.
- Loading Heavy Models: If you are loading a large TensorFlow or ONNX model into memory, you should almost certainly use a Singleton lifetime. Loading a 2GB model for every HTTP request (Scoped or Transient) will crash into your server’s memory instantly.
- Thread Safety: Because Singletons are shared across requests, ensure your code is thread safe. If your AI inference engine is not thread safe, you may need to implement locking mechanisms or object pooling.
- Avoid “Service Locator” Pattern: Do not manually ask the generic service provider for instances inside your classes (e.g., _services.GetService<T>()). Always use constructor injections. This makes dependencies explicit and avoids runtime errors.
Next Steps for Building Robust Systems
Mastering Dependency Injection is a prerequisite for building professional grade .NET applications. It decouples your code, simplifies unit testing, and allows for modular architecture that can scale with your project’s complexity.
By understanding the distinction between Transient, Scoped, and Singleton lifetimes, you can optimize memory usage critical when dealing with data intensive applications.
To further improve your development process and build reliable automation around your .NET deployments right now, we recommend exploring n8n:
- Get started with n8n: sign up for a free n8n cloud account.
- Discover n8n’s AI capabilities: explore n8n’s AI features and integrations.

Leave a comment