How to Use .NET with Azure Functions for Serverless Applications
Serverless computing has fundamentally changed how developers build and deploy applications, allowing teams to focus on code rather than infrastructure management. For organizations already invested in the Microsoft ecosystem, combining .NET with Azure Functions offers a powerful, scalable pathway to building robust serverless architectures.
In this guide, we will explore how to effectively leverage .NET with Azure Functions. We will cover the core concepts, the benefits of this integration, and provide a step-by-step walkthrough for setting up your first function. By the end, you will have a clear understanding of how to boost your AI capabilities and application performance using these tools.
Understanding the Architecture: .NET and Azure Functions
Before diving into code, it is crucial to understand why this pairing is so effective for enterprise-grade applications.
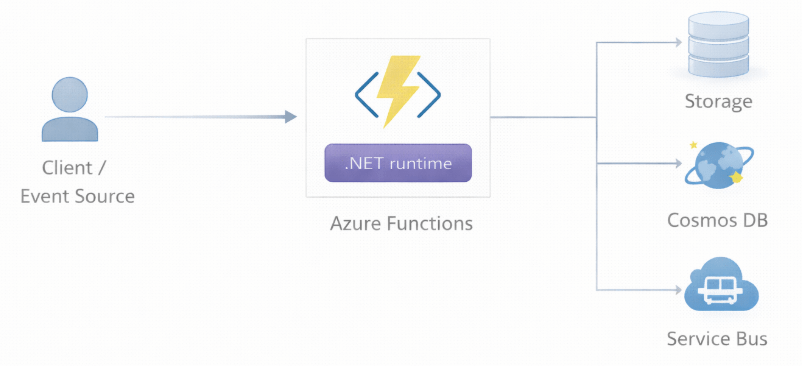
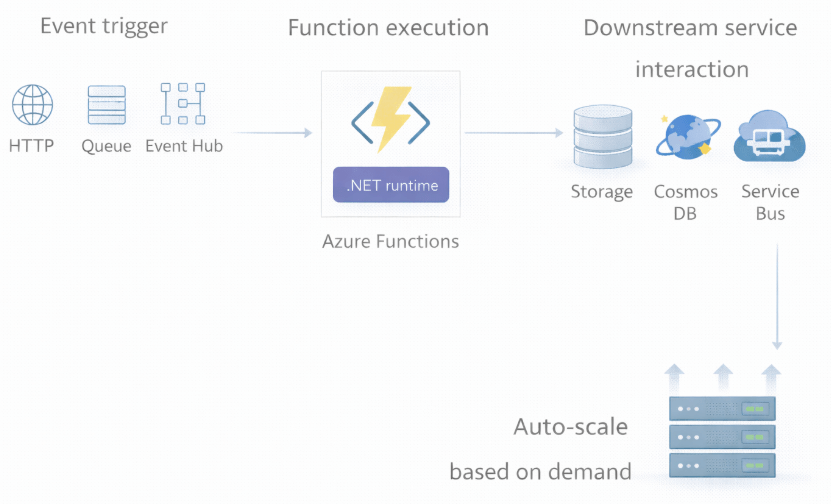
Azure Functions is an event-driven serverless compute platform. It allows you to run small pieces of code (functions) without worrying about application infrastructure. The infrastructure scales up or down automatically based on demand, which is ideal for variable workloads often found in AI data processing or real-time data insights.
When you bring .NET into this environment, you gain access to a mature, high-performance framework. The integration is seamless, allowing you to use the C# language features and libraries you already know.
Key Benefits of Using .NET on Azure
- High Performance: .NET is optimized for speed. When running on Azure Functions, particularly with the isolated worker model, you can achieve impressive cold start times and execution speeds.
- Seamless Integration: It integrates effortlessly with other Azure services like Cosmos DB, Azure Storage, and Azure Service Bus, often requiring just a few lines of configuration code.
- Unified Ecosystem: You can share code and libraries between your serverless functions and other .NET applications (like ASP.NET Core web APIs), reducing development overhead.
- Scalable Solutions: Azure Functions automatically handles the scaling. Whether you are processing ten events or ten million, the platform adjusts resources to meet demand.
The Two Hosting Models: In-Process vs. Isolated Worker
When developing Azure Functions with .NET, you currently have two primary hosting models to choose from. Understanding the difference is vital for long-term project success.
1. In-Process Model
This has been the traditional way to run .NET functions. In this model, your function code runs in the same process as the Azure Functions host runtime.
- Pros: Slightly faster execution due to fewer inter-process communication overheads; deep integration with the host.
- Cons: You are tightly coupled to the .NET version used by the host runtime. This creates dependency conflicts and makes upgrading .NET versions difficult.
2. Isolated Worker Model (Recommended)
In the isolated worker model, your function runs in a separate process from the Azure Functions host.
- Pros: Complete control over your application startup and configuration (Dependency Injection, Middleware); ability to use any version of .NET (including the latest releases like .NET 8 or 9) independently of the host.
- Cons: Historically, it lacked support for some bindings found in the in-process model, though Microsoft has largely closed this gap.
Recommendation: For new projects, especially those requiring the latest .NET features or specific middleware configurations, adopt the Isolated Worker model. It provides better forward compatibility and architectural flexibility.
Step-by-Step Guide: Building Your First .NET Azure Function
Let’s walk through creating a simple HTTP-triggered function using the Isolated Worker model.
Prerequisites
- Azure Subscription: You can start with a free account.
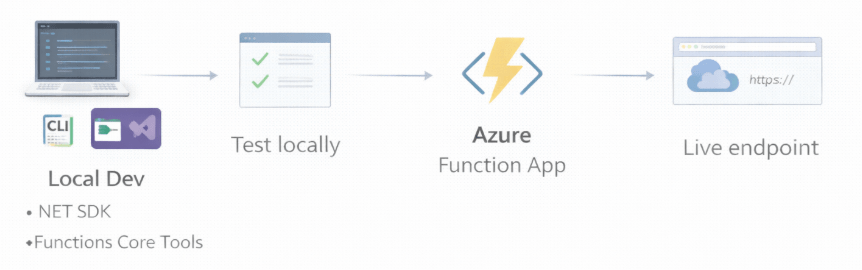
- Base Tools: Ensure you have the .NET 8 SDK (or later) installed.
- IDE: Visual Studio 2022 or VS Code with the Azure Functions extension.
- Azure Functions Core Tools: For running and debugging locally.
Step 1: Create the Project
Open your terminal or command prompt and run the following command to create a new project. We are specifying the isolated worker runtime.
func init MyFirstFunction –worker-runtime dotnet-isolated –target-framework net8.0
Navigate into the directory:
cd MyFirstFunction
Step 2: Create a Function
Now, let’s add a function to our project. We will create a simple HTTP trigger that responds to web requests.
func new –name ProcessData –template “HTTP trigger” –authlevel anonymous
Step 3: Examine the Code Structure
Open the project in your preferred editor. You will see a Program.cs file. This is unique to the isolated worker model and acts as the entry point for your application. This is where you configure services and middleware—very similar to an ASP.NET Core application.
var host = new HostBuilder()
.ConfigureFunctionsWorkerDefaults()
.ConfigureServices(services =>
{
// Register your own services here
// services.AddSingleton<IMyService, MyService>();
})
.Build();
host.Run();
Next, look at ProcessData.cs. This is your actual function code.
using System.Net;
using Microsoft.Azure.Functions.Worker;
using Microsoft.Azure.Functions.Worker.Http;
using Microsoft.Extensions.Logging;
public class ProcessData
{
private readonly ILogger _logger;
public ProcessData(ILoggerFactory loggerFactory)
{
_logger = loggerFactory.CreateLogger<ProcessData>();
}
[Function(“ProcessData”)]
public HttpResponseData Run([HttpTrigger(AuthorizationLevel.Anonymous, “get”, “post”)] HttpRequestData req)
{
_logger.LogInformation(“C# HTTP trigger function processed a request.”);
var response = req.CreateResponse(HttpStatusCode.OK);
response.Headers.Add(“Content-Type”, “text/plain; charset=utf-8”);
response.WriteString(“Welcome to Azure Functions with .NET Isolated Worker!”);
return response;
}
}
Step 4: Run Locally
To test your function, run the host locally:
func start
The terminal will output a URL (usually http://localhost:7071/api/ProcessData). Open this URL in your browser or a tool like Postman to see your function in action.
Integrating AI workflows
For audiences focused on AI and data science, Azure Functions acts as excellent glue code or a lightweight processing engine.
Scenario: Real-time Data Processing
Imagine you have an IoT device sending sensor data. You can use an Azure Function triggered by an Event Hub to ingest this data. inside the function, you can:
- Sanitize the incoming JSON payload.
- Call an external AI service (like Azure OpenAI or a custom model hosted on Azure ML) to analyze anomalies.
- Store the result in Cosmos DB.
Because the infrastructure is serverless, you only pay for the compute time used to process those specific events. This is far more cost-effective than running a dedicated server 24/7 waiting for sporadic data.
Best Practices for .NET on Azure Functions
To ensure your application is production-ready, consider these best practices:
- Dependency Injection (DI): Always use DI to manage dependencies. This makes your code testable and modular. The Isolated Worker model supports standard .NET DI patterns.
- Avoid Long-Running Processes: Azure Functions are designed for short-lived executions (default timeout is often 5 minutes). If you have a task that takes hours (like training a large model), use Azure Functions to trigger the job on a service designed for heavy lifting, such as Azure Batch or Azure Machine Learning, rather than doing the work inside the function itself.
- Optimize Cold Starts: In the Consumption plan, functions can go “idle” after periods of inactivity. The next request triggers a “cold start,” which adds latency. To mitigate this in critical applications, consider using the Premium Plan, which keeps instances warm.
- Use Durable Functions for State: If you need to orchestrate a complex workflow (e.g., Chain: Upload -> Validate -> Process -> Save), use the Durable Functions extension. It allows you to write stateful workflows in code, managing checkpoints and retries automatically.
Deployment
Deploying to Azure is straightforward via the CLI or Visual Studio.
func azure functionapp publish <YourFunctionAppName>
Ensure that your Azure resources (Resource Group, Storage Account, Function App) are provisioned before running the publish command. Using Infrastructure as Code (IaC) tools like Bicep or Terraform is recommended for reproducible deployments in enterprise environments.
Optimizing Model Training and Inference
While Azure Functions isn’t the primary compute target for training massive Deep Learning models (due to timeout and GPU limitations), it is excellent for inference (serving predictions) for lightweight models or routing requests.
For example, you can host an ONNX model directly within a .NET Azure Function for extremely low-latency predictions on structured data. This avoids the overhead of calling an external HTTP endpoint for every prediction, keeping your real-time data insights fast and efficient.
Next Steps
Migrating to or starting with serverless architectures can significantly reduce operational overhead and improve the scalability of your solutions. By combining the robustness of .NET with the flexibility of Azure Functions, you create a foundation capable of handling everything from simple APIs to complex, event-driven AI pipelines.
To further improve your development process and build reliable AI-powered automation right now, we recommend exploring the Durable Functions library to see how you can define complex orchestrations using simple C# code.

Leave a comment