Building and Deploying Scalable Applications on Microsoft Azure: A Developer’s Guide
Moving an application from a local development environment to a production-ready cloud infrastructure is a critical milestone for any software engineer. For data scientists and developers working with AI models, this transition is often where the complexity spikes. You aren’t just deploying code; you are managing dependencies, ensuring high-performance computing access, and planning massive scalability.
Microsoft Azure provides a robust ecosystem for these tasks, offering seamless integration with tools like Python, TensorFlow, and PyTorch. However, the sheer number of services available can be overwhelming. Which computer option offers the best ROI? How do you automate deployment to reduce operational costs?
In this article, you will learn:
- How to prepare your environment for cloud-native development.
- The differences between Azure App Service and Azure Kubernetes Service (AKS).
- Steps to containerize your application using Azure Container Registry.
- How to implement CI/CD for automated, scalable AI solutions.
The Azure Ecosystem for AI and App Development
Before writing deployment scripts, it is essential to understand why Azure is a preferred choice for intermediate and expert developers. The platform creates a unified environment where high-performance computing meets developer-friendly tooling.
For AI projects specifically, Azure allows you to optimize model training by providing access to GPU-accelerated virtual machines and specialized AI infrastructure. Whether you are deploying a simple Python Flask API or a complex microservices architecture serving real-time data insights, the underlying principles remain the same: containerization, orchestration, and automation.
Step 1: Preparing Your Azure Environment
The foundation of any successful deployment is a well-organized resource hierarchy. We recommend using the Azure Command-Line Interface (CLI) over the portal for reproducibility and speed.
Setting up Resource Groups
Every resource in Azure must belong to a Resource Group. Think of this as a logical container that holds related resources for an Azure solution. By grouping resources that share the same lifecycle, you can easily deploy, update, and delete them as a group.
To create a resource group in a specific region (like East US), you would use the following CLI command:
az group create –name myResourceGroup –location eastus
Azure Container Registry (ACR)
Modern AI deployment relies heavily on containers to ensure consistency across environments. Azure Container Registry (ACR) is a managed Docker registry service based on the open-source Docker Registry 2.0. It allows you to build, store, and manage container images and artifacts.
For developers using PyTorch or TensorFlow, ACR is where your Docker images containing the model and its dependencies will live before being pushed to a compute service.
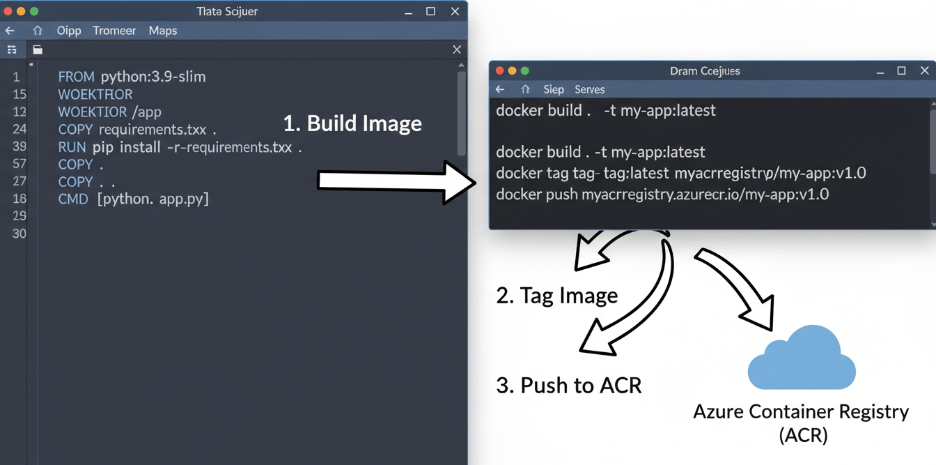
Step 2: Containerizing Your Application
To achieve seamless integration across different environments, you must package your application and its dependencies into a Docker container. This ensures that your application runs identically on your local machine and in the cloud.
- Create a Dockerfile: Define your environment. If you are building a Python-based AI model, your Dockerfile will start by pulling a base Python image, installing requirements (like pandas, scikit-learn, or tensorflow), and copying your source code.
- Build the Image: Use the Docker CLI to build your image locally.
- Push to ACR: Tag your local image with the login server name of your ACR instance and push it to the registry.
Once your image is in ACR, it is ready to be deployed to a scalable computer service.
Step 3: Choosing the Right Compute Option
Azure offers several ways to run containerized applications. Choosing the right one depends on your specific needs regarding control, cost, and scalability.
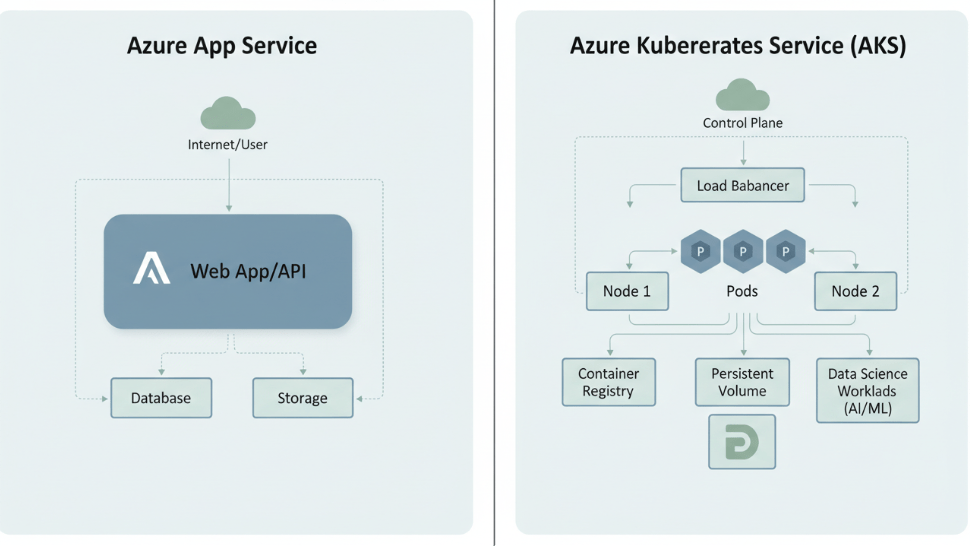
Azure App Service (Web App for Containers)
If you need to deploy a straightforward web application or a REST API endpoint for your model without managing infrastructure, Azure App Service is the ideal starting point. It offers built-in autoscaling and load balancing. It simplifies the process by abstracting the underlying infrastructure, allowing you to focus on the code.
Azure Kubernetes Service (AKS)
For more complex scenarios, such as microservices architectures or large-scale AI model serving where you need fine-grained control over orchestration, AKS is the industry standard.
AKS provides a managed Kubernetes environment. It handles critical tasks like health monitoring and maintenance. Importantly, AKS supports node pool scaling, meaning it can automatically spin up additional virtual machines (nodes) when your application demands more resources, and scale down when demand drops. This is a crucial feature for maintaining performance efficiency and managing operational costs.
Step 4: Automating Deployment with CI/CD
Manual deployments are prone to human error and are not sustainable for professional teams. To increase deployment frequency and reliability, you should implement a Continuous Integration and Continuous Deployment (CI/CD) pipeline.
GitHub Actions integrates seamlessly with Azure, allowing you to automate the workflow from code to commit to cloud deployment.
The Workflow
A typical pipeline for an AI application looks like this:
- Trigger: A developer pushes code to the main branch in GitHub.
- Build: GitHub Actions triggers a workflow that builds a new Docker image.
- Test: Automated unit tests run to ensure code integrity.
- Push: The successful image is pushed to the Azure Container Registry.
- Deploy: The workflow instructs AKS (or App Service) to pull the new image and update the running application.
This automation ensures that your latest features and model improvements reach production faster, boosting your team’s overall productivity.
Step 5: Monitoring and Optimization
Deploying the application is not the end of the road. To ensure your application delivers real-time data insights and maintains high availability, you must monitor its health.
Azure Monitor and Application Insights
Azure Monitor collects distinct data types of metrics and logs from every layer of your stack. By integrating Application Insights, you can detect performance anomalies. For example, if your model’s inference time spikes, Application Insights will flag the latency, allowing you to investigate whether the issue lies in the code or resource constraints.
Autoscaling
Both App Service and AKS support autoscaling rules. You can define triggers based on CPU usage or memory consumption.
- Scale Up/Down: Increasing or decreasing the capacity of existing resources (e.g., moving to a larger VM size).
- Scale Out/In: Adding or removing instances of the resource.
For AI applications with variable traffic patterns, configuring these rules is essential to balance high performance with budget constraints.
Conclusion
Building and deploying applications on Microsoft Azure offers a powerful path to modernizing your development workflow. By leveraging tools like AKS and Azure Container Registry, you can deploy scalable solutions that handle the rigorous demands of modern AI workloads.
While the learning curve for cloud-native technologies can be steep, the payoff is significant: reduced training times, seamless tool integration, and the ability to deliver real-time value to your users. Start by containerizing a small module of your current project, deploy it using the steps outlined above, and experience the difference in performance and scalability firsthand.

Leave a comment