A Beginner’s Guide to Building RESTful APIs with ASP.NET Core
If you’re working in the AI or data science space, you likely live in a world dominated by Python. It’s the undisputed king of machine learning and data analysis. However, when it comes time to deploy those models or build the high-performance infrastructure that wraps around them, you might hit a bottleneck. While Python is excellent for training models, it isn’t always the most performant option for serving high load APIs.
Enter ASP.NET Core. It is a cross platform, open-source framework developed by Microsoft that has quietly become a powerhouse for building fast, scalable web APIs. For developers focused on performance and scalability two critical factors when serving complex AI models or handling massive datasets, ASP.NET Core is a compelling choice.
In this guide, we will walk you through the essentials of building your first RESTful API with ASP.NET Core. We won’t just look at syntax; we’ll explore why this framework performs so well in benchmarks and how it can integrate into your existing development stack. By the end, you will have a functional API and a clear understanding of how to leverage .NET for your backend infrastructure.
Why Choose ASP.NET Core for APIs?
Before we dive into the code, it is important to understand why you might choose ASP.NET Core over other popular frameworks like Flask, Django, or Express.js.

Unmatched Performance
Speed is often the primary driver for switching to .NET. In the independent TechEmpower benchmarks, ASP.NET Core consistently outperforms major competitors. For instance, recent tests showed .NET processing over 7 million requests per second, compared to significantly lower numbers for Node.js and Java Servlets. When you are serving real-time predictions or handling high-frequency data ingestion, this raw throughput translates directly to lower latency and reduced cloud costs.
True Cross Platform Capabilities
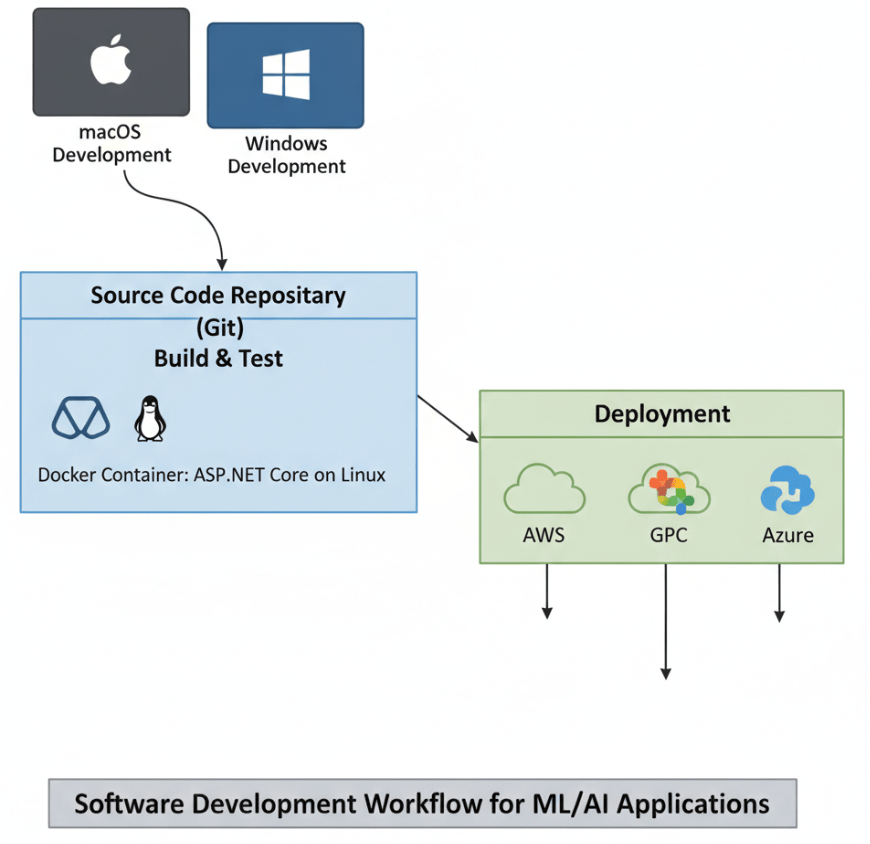
Gone are the days when .NET means “Windows only.” ASP.NET Core runs natively on Linux, macOS, and Windows. This means you can develop a MacBook, deploy to a Linux Docker container, and host any major cloud provider, including AWS and Google Cloud, just as easily as you would with Python or Go.
Built in Security and Tooling
ASP.NET Core comes with battery including industry standard features. Dependency Injection (DI) is built right into the framework, not bolted on. It also includes robust protection against common vulnerabilities like Cross Site Scripting (XSS) and Cross Site Request Forgery (CSRF), ensuring your data pipelines remain secure by default.
Setting Up Your Development Environment
To get started, you will need a few standard tools. If you are coming from a Python background, the setup is straightforward.
- Download the .NET SDK: Go to the official Microsoft .NET download page and install the latest .NET SDK (Software Development Kit) for your operating system.
- Choose an IDE: While Visual Studio is the flagship IDE, Visual Studio Code (VS Code) is highly recommended for a lightweight, cross-platform experience. If you use VS Code, install the “C# Dev Kit” extension for syntax highlighting and debugging support.
Step 1: Create Your Web API Project
ASP.NET Core provides templates that scaffold a project with all the necessary configurations. Open your terminal or command prompt and run the following command:
dotnet new webapi n MyAiDataService
This command creates a new folder named MyAiDataService containing a basic API project. Navigate into the directory:
cd MyAiDataService
The project structure might look slightly different depending on your .NET version, but the key file to note is Program.cs. This file acts as the entry point for your application, configuring the web server and the middleware pipeline.
Step 2: Define Your Data Model
In a RESTful API, we typically deal with resources. For this example, let’s imagine we are building a simple service to manage “ModelMetadata” tracking versions and accuracy scores of different AI models.
Create a new folder named Models and add a file called ModelMetadata.cs. Paste the following C# code:
namespace MyAiDataService.Models
{
public class ModelMetadata
{
public int Id { get; set; }
public string Name { get; set; }
public string Framework { get; set; } // e.g., “TensorFlow”, “PyTorch”
public double AccuracyScore { get; set; }
public DateTime CreatedAt { get; set; }
}
}
This class acts as our Data Transfer Object (DTO), defining the shape of the data our API will accept and return.
Step 3: Create an API Controller
Controllers are the heart of a REST API in ASP.NET Core. They handle incoming HTTP requests and determine what response to send back.
Create a Controllers folder (if it doesn’t exist) and add a file named ModelsController.cs. We will implement a basic memory store to simulate a database for this tutorial.
using Microsoft.AspNetCore.Mvc;
using MyAiDataService.Models;
namespace MyAiDataService.Controllers
{
[ApiController]
[Route(“api/[controller]”)]
public class ModelsController : ControllerBase
{
// Simulating a database with a static list
private static List<ModelMetadata> _models = new List<ModelMetadata>
{
new ModelMetadata { Id = 1, Name = “ImageClassifier_V1”, Framework = “PyTorch”, AccuracyScore = 0.85, CreatedAt = DateTime.UtcNow },
new ModelMetadata { Id = 2, Name = “SentimentAnalyzer_V2”, Framework = “TensorFlow”, AccuracyScore = 0.92, CreatedAt = DateTime.UtcNow }
};
// GET: api/models
[HttpGet]
public ActionResult<IEnumerable<ModelMetadata>> GetModels()
{
return Ok(_models);
}
// GET: api/models/1
[HttpGet(“{id}”)]
public ActionResult<ModelMetadata> GetModel(int id)
{
var model = _models.FirstOrDefault(m => m.Id == id);
if (model == null)
{
return NotFound();
}
return Ok(model);
}
// POST: api/models
[HttpPost]
public ActionResult<ModelMetadata> CreateModel(ModelMetadata newModel)
{
newModel.Id = _models.Max(m => m.Id) + 1;
newModel.CreatedAt = DateTime.UtcNow;
_models.Add(newModel);
return CreatedAtAction(nameof(GetModel), new RouteValueDictionary { { “id”, newModel.Id } }, newModel);
}
}
}
Understanding the Code
- Attributes: [ApiController] and [Route] configure the class as an API endpoint. The route is determined dynamically by the controller’s name (e.g., api/models).
- Action Methods: The methods of GetModels, GetModel, and CreateModel map to HTTP verbs GET and POST.
- Return Types: ActionResult allows us to return specific HTTP status codes. Ok() returns a 200 status, NotFound() returns 404, and CreatedAtAction() returns 201 with the location header of the new resource.
Step 4: Run and Test Your API
One of the best features of modern ASP.NET Core development is the integrated Swagger UI (OpenAPI). It provides a visual interface to test your API without writing external scripts.
Run your application from the terminal:
dotnet run
The terminal will display the local URL where your app is running (usually localhost with a port number). Open your browser and navigate to that URL followed by /swagger.
You will see an interactive dashboard listing your endpoints. You can execute requests directly from the browser:
- Click on GET /api/models.
- Click Try it out and then Execute.
- You will see the JSON response containing the sample data we added.
This immediate feedback loop is invaluable when debugging or demonstrating API capabilities to your team.
Frequently Asked Questions
Can I use Python models with an ASP.NET Core API?
Yes. A common architecture involves training models in Python and exporting them to formats like ONNX (Open Neural Network Exchange). .NET has excellent support for running ONNX models directly via the Microsoft.ML.OnnxRuntime library. Alternatively, you can keep your model in a lightweight Python microservice and use ASP.NET Core as the high-performance gateway that orchestrates requests, handles authentication, and manages traffic.
How does ASP.NET Core handle database connections?
ASP.NET Core uses Entity Framework Core (EF Core), a powerful Object Relational Mapper (ORM). EF Core allows you to work with databases using C# objects, eliminating the need for most raw SQL queries. It supports SQL Server, PostgreSQL, MySQL, SQLite, and even Cosmos DB, making it highly versatile for various data storage needs.
Is dependency injection hard to learn?
While the concept might seem complex initially, ASP.NET Core makes it simple. It uses a built-in container where you register your services (like database contexts or AI inference engines) in Program.cs. You then simply declare these services in the constructor of your Controllers, and the framework automatically provides them at runtime. This promotes loosely coupled, testable code.
Scaling Your New API
Building the API is just the first step. Because you are using ASP.NET Core, you have paved the way for easy scalability. The framework is designed to run efficiently in containerized environments like Docker and Kubernetes.
If you are looking to integrate this into a larger system, consider these next steps:
- Database Integration: Replace the in-memory list with a real database using Entity Framework Core. PostgreSQL is a popular choice for its JSON support and vector extensions.
- Authentication: Secure your API using JWT (JSON Web Tokens) to ensure only authorized users or services can access your data.
- Async/Await: Notice we didn’t use async in the example for simplicity? In a real-world scenario, using asynchronous programming in C# is crucial for freeing threads while waiting for I/O operations, further boosting throughput.
By choosing ASP.NET Core, you are equipping yourself with a toolset that bridges the gap between rapid development and enterprise grade performance. Whether you are building internal tools for your data team or public facing AI products, you now have a solid foundation to build upon.

Leave a comment