Remember when talking to a computer felt like typing commands into a void? Those days are gone. Today, artificial intelligence chats feel surprisingly human. Whether you want to automate customer service or just build a cool project for your portfolio, creating your own bot is more accessible than ever.
Building an intelligent assistant might sound like a task reserved for tech giants, but the tools available now make it possible for beginners to jump right in. You don’t need a PhD in machine learning to create something functional and impressive.
This guide walks you through the entire process. You will learn how to choose the right tools, structure your bot logic, and implement crucial features like memory and safety. By the end, you’ll have a roadmap to launch your very first AI chatbot.
What is a Conversational AI?
Before writing code, we need to understand what separates a modern conversational AI chatbot from the clunky bots of the past.
Old-school chatbots were rule-based. They functioned like a flowchart: if the user says “A,” reply with “B.” If the user said something unexpected, the bot broke.
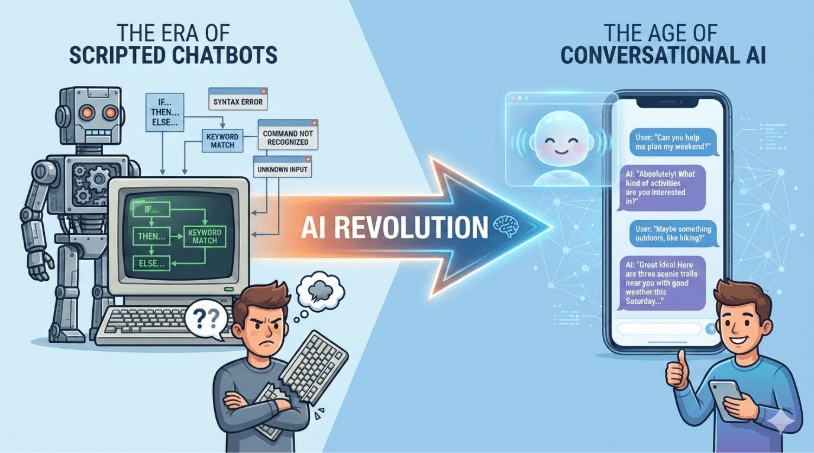
Conversational AI is different. It uses Large Language Models (LLMs) to understand context, intent, and nuance. It doesn’t just match keywords; it predicts the best response based on vast amounts of training data. This allows for a fluid online AI chatbot experience where users can speak naturally rather than memorizing specific commands.
Step 1: Define Your Bot’s Purpose and Persona
Great AI chatbots start with a clear plan. If you try to build a bot that does everything, it will likely do nothing well. Start by asking yourself two questions:
- What problem does this solve? Is it a customer support agent? A language tutor? A coding assistant?
- Who is it talking to? A chatbot AI designed for gamers should sound different than one designed for banking clients.
Create a “system prompt” or a persona for your bot. This is the foundational instruction that tells the AI how to behave. For example: “You are a helpful, friendly gardening expert who uses simple language.” This ensures your artificial intelligence chats remain consistent.
Step 2: Choose Your Technology Stack
You have two main paths when building an AI chatbot:
- No-Code Platforms: Tools like Chatbase or Voiceflow allow you to drag and drop logic blocks. This is the fastest route for an AI chat online.
- Custom Coding: Using Python or Node.js gives you full control. This guide focuses on this approach because it offers the most flexibility.
For the brain of your bot, you will likely connect to an API. The most popular option currently is AI chatbot GPT technology (like OpenAI’s GPT-4). It provides state-of-the-art reasoning capabilities without requiring you to host massive servers. Other options include Anthropic’s Claude or open-source models like Llama.
Step 3: Setting Up the Development Environment
To get started with a custom build, you will typically need:
- Python: The standard language for AI development.
- An API Key: From your chosen provider (e.g., OpenAI).
- Framework: Streamlit or Gradio are excellent for beginners to build user interfaces quickly.
Once your environment is ready, the core code is surprisingly simple. You send the user’s message to the API, and the model returns a response. However, making it “smart” requires a few more steps.
Step 4: Handling Memory and Context
A major challenge with AI chatbots is memory. By default, LLMs are stateless. This means if you say “Hi, I’m Bob,” and then follow up with “What’s my name?”, the model won’t know unless you send the conversation history back with every new message.
To build a true conversational AI chatbot, you must design a loop that appends new messages to a history list. This list gets sent to the API every time the user hits enter.
However, you can’t keep history forever because of cost and technical limits. You will need to implement logic to summarize or truncate older parts of the conversation.
Step 5: Implementing Safeguards
When you unleash an online AI chatbot into the wild, safety is paramount. You don’t want your bot to generate toxic content or hallucinating false facts.
Managing AI safeguards and lengthy conversations effectively is what separates a toy project from a professional tool.
- Input Filtering: Check what users are typing before sending it to the AI.
- Output Validation: Ensure the AI’s response adheres to your guidelines.
- Context Management: In long chats, the AI might drift from its original instructions. Regularly re-injecting the system prompt helps keep it on track.
Step 6: Archiving and Analytics
How do you know if your bot is actually helpful? You need data. You should build a system to store chat logs. An AI chatbot conversations archive is a goldmine for improvement.
Reviewing your AI chatbot conversations archive allows you to:
- Identify where the bot gets confused.
- Spot unanswered questions to improve your knowledge base.
- Fine-tune the system prompt based on real user interactions.
Privacy Note: Always inform users if you are recording their chats and ensure you handle data securely.
Step 7: Testing and Iteration
Your first version won’t be perfect. Test your AI chatbot with friends or colleagues first. Watch how they interact with it. Do they ask questions you didn’t anticipate? Does the chatbot AI break when they use slang?
Refining an AI chat online is an iterative process. You tweak the prompt, adjust the temperature (a setting that controls creativity), and test again.
Conclusion
Building your first AI chatbot is a rewarding journey into the world of artificial intelligence. It teaches you not just about coding, but about user experience, prompt engineering, and the ethics of AI.
Start small. Build a simple bot that answers questions about a specific topic. Once you master the basics of connecting to an AI chatbot GPT model and managing history, you can expand into complex agents that can browse the web or execute code. The barrier to entry has never been lower, so grab an API key and start building today.

Leave a comment